This is an archive of the version 1.x G5. Version 2.0 is now a RealSimGear product (existing customers have been transferred to the new product).
For general integration:
- Run the G5 Aircraft installer application inside “X-Plane 11/G5 Aircraft Installer”
- Open the application for your relevant operating system (G5-osx-installer for MacOS, G5-win-installer.exe for Windows)
- When prompted, choose the directory of the aircraft which you want the G5 installed into
- The installation should now occur
- Configure your settings by opening the file “X-Plane 11/Aircraft/***your aircraft of choice***/g5.cfg” in the text editor of your choice (TextEdit on Mac, Notepad/Notepad++ on Windows both work great) (See G5 Configuration (g5.cfg) Description for details)
- Configure a keyboard or joystick command in X-Plane to toggle any of these popups (With 1.2.0, the G5s can also be popped out from the X-Plane plugins bar)
- G5 (A): afm/g5/cmd/a/popup
- G5 (A – Bezel-less): afm/g5/cmd/a/popup_noBezel
- G5 (B): afm/g5/cmd/b/popup
- G5 (B – Bezel-less): afm/g5/cmd/b/popup_noBezel
- To adjust the airspeed, a graphical customization is needed. An Adobe Illustrator file is used to create the file “resources/g5/g5_airspeed.png”. You can customize the red/yellow/green arcs by modifying and exporting the file from here. Feel free to let us know what airspeed customizations you need and we can generate this file for you.
- When the command is triggered, the popup should show!
Additional steps for 3D integration:
3D Integration requires access to the source cockpit object to be able to add the screen and manipulators. These steps are targeted towards aircraft developers.
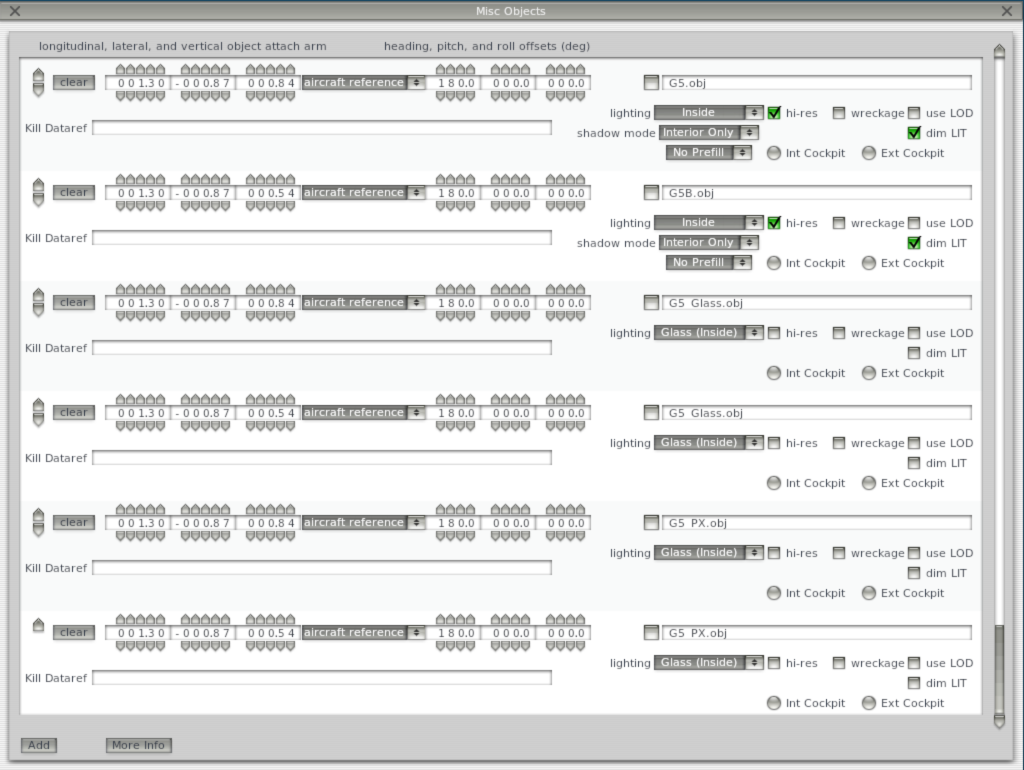
- Add the G5 objects to your aircraft in Plane Maker (Download our own Creative Commons Attribution 3.0 Licensed G5 3D model for the G5 from here): As shown below, make sure that you:
- Use G5.obj for the main G5, and G5B.obj for the secondary. This makes sure that the lights on each G5 correlate with each other.
- Rotation for the object is 180º (if applicable for your aircraft)
- Set lighting to be inside
- Set shadow mode to interior only
- Make sure hi-res is checked
- Add two instances of G5_Glass.obj and G5_Px.obj each, one for each G5. These add the glass and pixel effects.
- Rotation for the object is 180º (if applicable for your aircraft)
- Set lighting to be Glass (inside)
- Use G5.obj for the main G5, and G5B.obj for the secondary. This makes sure that the lights on each G5 correlate with each other.
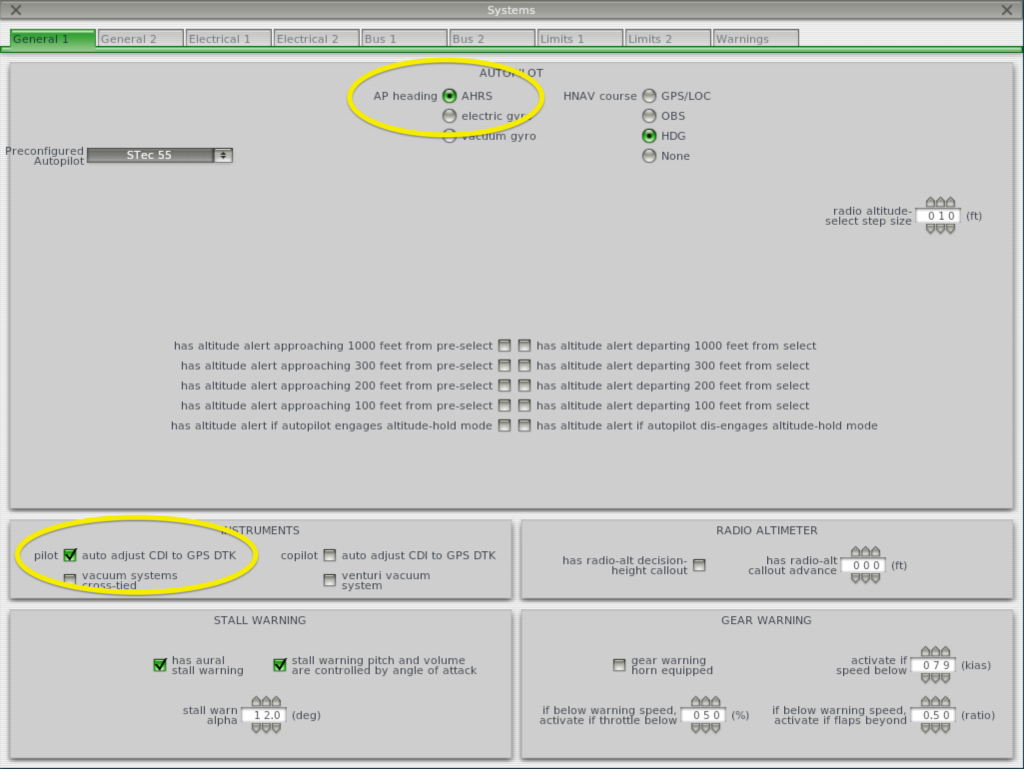
- In Plane Maker → Systems, check auto adjust CDI to GPS DTK and set AP Heading to AHRS
- Note: This is a requirement to allow the GPS to auto-set course. The G5 will still function without this, course will just need to be manually adjusted with the GPS.
- In your cockpit object (where all your manipulators are), the display texture will be needed.
- Match the UV coordinates of the rectangle to what is set in your g5.cfg
- Add the commands for the knobs (A matches for PFD unit, B matches for HSI unit):
- afm/g5/cmd/a/power
- afm/g5/cmd/a/knobL
- afm/g5/cmd/a/knobR
- afm/g5/cmd/a/knobPush
- afm/g5/cmd/b/power
- afm/g5/cmd/b/knobL
- afm/g5/cmd/b/knobR
- afm/g5/cmd/b/knobPush
For Aircraft Developers: If you don’t want to manage separate ACF files, you can have your plugin manage the “Kill Dataref” to hide the object when the user does not have the G5 installed.
If you run into any issues, please reach out to support@afmsim.com and we will help